FuzzyNugs 0 Posted September 13, 2013 After 12k miles of bouncing around on the DR650's stock shock, it was well past time for an upgrade. There are several options, Cogent-Dynamics, Ricor, Race Tech, Ohlins, Elka, or even a stock rebuild... but I couldn't make my mind up. Then I found a Dutch company called Hyperpro, known for their progressive springs. Turns out they make an emulsion shock for my bike, but I couldn't find any reviews specifically for the DR. The few reviews I could find from BMW owners liked their Hyperpro shocks. I liked the idea of trying something new to share with other DR riders. I'd be the test case. Worst case I'm out $600 right?...oh and they had front springs too(have to get the set of course), so after all combined with shipping, this was to be about an $800 experiment. I dropped the new springs in my old oil before my big Sierras trip last month. They were a definite improvement, but something wasn't right. The new springs called for an oil level of 220mm compared to the stock 150mm. Also, over the summer I've been collecting up a spare set of plastics and a tank. Mine are pretty scratched up and the dirty white constantly looked like garbage. It was time for a paint job. Here's how it all unfolded over the past 2 weeks or so..warning, too many pictures ahead. Tearing down the bike after the Sierras trip, started off with a rear tire change and then removed the airbox to pull the old shock out the top of the frame. The brand new Hyperpro in wacky crazy purple VS the OEM Suzuki Pogo-matic After some careful maneuvering, my bike has new legs. On to painting for a bit. I used Aircraft Stripper from Wally World to eat away most of the stock paint. It was a blue 05-06 tank. It didn't work as well as it does on Youtube. I had to hand sand the last 10-15% of the paint off. Got it mostly shiny and then primed. Probably the worst place to use spray paint. Coastal breezes upon opening the garage door for fresh air sent overspray afloat. In the end it wasn't too bad fortunately. Primer done For the top coat, I used Rustoleum Gloss Black Enamel. Propped the tank up on a cardboard box. New to me plastics ready for some Krylon Fusion for Plastics, Gloss Black. Making a mess everywhere I was going to get fancy and do an extra color or two, but after reading the dry time of 7 days I said screw that, I need to ride the dang thing. So all black it will be. Back to the bike, while things dry. Pulled the front end, swapped a fresh tire on and started mounting my new rear rack, OEM one Suzuki makes. This is my 3rd rack now I think, and I wish I had bought it from the start. Bolts directly to the subframe crossbar. Requires drilling two 17mm holes through the rear fender. Realizing I didn't have any drill bits that big, I instinctively went to Harbor Freight down the street and found this step bit to do the job. Looks fresh! For the front suspension, I had several factors to consider. I had been using Ricor Intiminator drop-in valves which call for a switch from 10wt to 5wt oil. The Hyperpro springs called for 10wt oil at 220mm instead of Suzuki's 150mm measurement. I decided to keep the 5wt oil and used a measured zip-tie to get 220mm of oil height. So just less oil than what I had in for my Sierra trip. The new fork springs are significantly longer and call for the removal of the stock spacer. Fine by me as those suckers are heavy. Ended up 12mm over the tube when standing freely. This skeleton needs some skin. I rotated my handlebars forward a bit to make standing easier. Also installed the Dirtbagz racks that TrophyHunter dontated. Getting close, notice my cardboard box and foam top "work bench". Huzzah! She rolls again, first ride in a month since my trip and hurting my ankle. Feels like a brand new bike. Started at the bottom of Nate Harrison at 1800 with my gps calling for a 1900 sunset. One hour of play time. The luggage works great, very slim and lightweight. Basically two metal poles and two backpacks. Made it to the top and turned right around with 20 minutes of daylight. Every other turn was a beautiful sunset. Only to get better as I went downhill. 5 minutes to sunset. All in all, I am very happy with how the suspension turned out. Just in the garage, I've gained an inch in skid plate clearance. I knew it was an upgrade with the front springs alone last month. After correcting the oil level AND adding the rear shock..WOW. Immediately, things seemed smoother on the street. Increased acceleration and response as the bike was no longer sagging through the suspension on take off. Once I hit the dirt I knew something was different. Nate Harrison has a lot of washboard. Before my rear tire would skip and stutter constantly, leaving me in less control. Now I can feel the bike making traction over almost any bump, rut, or pothole. The first thing that popped into my mind was the time Afry let me try his Husky 450. It was the exact same feeling of being on rails, only on a much heavier bike. I raced my way up Palomar and then gave it a downhill run. Once again, the suspension earned it's value. Hard braking into turns gave me that same positive contact feeling on the rear which before would start to slip and slide. It was a great little test run for the bike. The painting process proved to be more effort than I imagined. It didn't come out perfect, but I'm not a professional. That and I expect it to get thrashed again soon. It would have been much better had I a better place to paint. Can't wait for Saturday to give this thing a real test when we head for lobsters in Baja! Share this post Link to post Share on other sites
hodnettjj 0 Posted September 13, 2013 Great write up... looks good. I may be inspired to color change the DRZ... Share this post Link to post Share on other sites
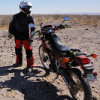
bikeslut 1 Posted September 13, 2013 I always appreciate guys taking some time to document the process...great pics Share this post Link to post Share on other sites
Todd Whiteside 0 Posted September 13, 2013 Nice work man and great post. That DR looking downright sexy man! Well done.. Bring on Baja! Share this post Link to post Share on other sites
TrophyHunter 15 Posted September 13, 2013 Great stuff, Kris. I'm still a tinkerer at heart so also appreciate the process documentation. I had the same feeling when I upgraded my suspension....a world of difference. Share this post Link to post Share on other sites
Wintyfresh 46 Posted September 13, 2013 That looks great and it sounds like it rides great too, well done man! Share this post Link to post Share on other sites
kato 54 Posted September 13, 2013 the DR is looking good stealth! I painted my old klr white with the same krylon stuff but I couldn't keep it looking good, guess I was crashing (and scratching it) too damn much ahah, there must be some sort of clear coating that could have been sprayed over it probably. Share this post Link to post Share on other sites
FuzzyNugs 0 Posted September 13, 2013 the DR is looking good stealth! I painted my old klr white with the same krylon stuff but I couldn't keep it looking good, guess I was crashing (and scratching it) too damn much ahah, there must be some sort of clear coating that could have been sprayed over it probably. Haha, yes there is a Krylon for Plastics clear coat, even bought 2 cans. I just didn't want to wait for it to dry. Lazy..but I'll have it for the next touch up. Share this post Link to post Share on other sites
FuzzyNugs 0 Posted September 13, 2013 Great stuff, Kris. I'm still a tinkerer at heart so also appreciate the process documentation. I had the same feeling when I upgraded my suspension....a world of difference. Yup, always fun to have a few pictures to look back at. Helps in writing this stuff up too and to show what not to do..paint in an enclosed shared garage. To answer your question about the lights from advrider, they are these from superbrightleds.com: Lights And I also bought the Wiring Harness, but it was obviously for a car. I had to remove a few feet of wire running to each light. They bolted perfectly to the front reflector mounts. A little big, but they work for me and were super cheap at $120 total. Share this post Link to post Share on other sites
Goofy Footer 539 Posted September 13, 2013 Great stuff, Kris. I'm still a tinkerer at heart so also appreciate the process documentation. I had the same feeling when I upgraded my suspension....a world of difference. Yup, always fun to have a few pictures to look back at. Helps in writing this stuff up too and to show what not to do..paint in an enclosed shared garage. To answer your question about the lights from advrider, they are these from superbrightleds.com: Lights And I also bought the Wiring Harness, but it was obviously for a car. I had to remove a few feet of wire running to each light. They bolted perfectly to the front reflector mounts. A little big, but they work for me and were super cheap at $120 total. Kris, how're the optics with these lights? 1700 lumens for $50 is solid. How well do they light up the road? Are you using them as driving lights or more "to be seen" ? Share this post Link to post Share on other sites
TrophyHunter 15 Posted September 13, 2013 Those lights look similar to Jim Martins quick change off road lighting for his XR650. I dropped my skidplate there today for some additions and he showed me his set up. He has 2 of those lights and a center light which appears to be the 6 inch all on a custom rack. Share this post Link to post Share on other sites
FuzzyNugs 0 Posted September 14, 2013 Kris, how're the optics with these lights? 1700 lumens for $50 is solid. How well do they light up the road? Are you using them as driving lights or more "to be seen" ? I'm pretty impressed with them for the money, but I don't have much experience with lighting. They certainly won't be a beaming laser like your Cyclops, or the concentrated Sun power of the Squadron. The high lumen output for the size/price was a plus. All I can really say is they are better, but I had nothing before. They definitely send light down the road. Last night coming home in the dark on 76 I did a couple on off tests. Reflectors in the distance really brighten up, but I turn them off like high beams for oncoming traffic. For divided roads they are great for visibility. I like to think it makes me more visible to cars when splitting lanes. Even more when dark as it hits their mirrors. BUT, the main reason I wanted them was for more peripheral visibility at night on trails and tight roads. I got the 40 degree beam instead of 20 for this and feel these work well for the purpose and price. Better view of the front Share this post Link to post Share on other sites
Afry 1 Posted September 14, 2013 Looking sweet! I have a plate for that stock rack if you want it. Share this post Link to post Share on other sites
eddie 0 Posted September 16, 2013 Orange is always a good color. Great write up... looks good. I may be inspired to color change the DRZ... Share this post Link to post Share on other sites
Goofy Footer 539 Posted September 16, 2013 Orange is always a good color. Costly, high maintenance, demands fancy accessories but... Share this post Link to post Share on other sites
Goofy Footer 539 Posted September 16, 2013 Kris, how're the optics with these lights? 1700 lumens for $50 is solid. How well do they light up the road? Are you using them as driving lights or more "to be seen" ? I'm pretty impressed with them for the money, but I don't have much experience with lighting. They certainly won't be a beaming laser like your Cyclops, or the concentrated Sun power of the Squadron. The high lumen output for the size/price was a plus. All I can really say is they are better, but I had nothing before. They definitely send light down the road. Last night coming home in the dark on 76 I did a couple on off tests. Reflectors in the distance really brighten up, but I turn them off like high beams for oncoming traffic. For divided roads they are great for visibility. I like to think it makes me more visible to cars when splitting lanes. Even more when dark as it hits their mirrors. BUT, the main reason I wanted them was for more peripheral visibility at night on trails and tight roads. I got the 40 degree beam instead of 20 for this and feel these work well for the purpose and price. Better view of the front Excellent write up thank you. I'm stoked you're happy with them. Even the smallest LEDs seem to be pumping out so much light these days. I wonder what lights will look like in 2-3 years. Your cost to install those lights is waay more easy to swallow than some of the higher cost range lights (plus dimmers, switches etc) that tempt me. Your review reminds me to keep in focus my 'intended use' for lights. I admit I've read through countless Rigid Industries, Baja Designs, helmet lights, mountain bike lights etc etc threads recently and it's easy to lose focus on what I 'actually need' vs what is the most awesome, current, up to the date, high tech, $, bitchen light setup. For instance this guy's setup is ridiculous - Do I want it, hell yes! Do I need it? Probably not. Will my wallet like it? Heck no! Are you going to the meeting on Tuesday? If so, please ride over so I can check out those lights - I'd love to see them in person! Share this post Link to post Share on other sites